I had a rare chance to work as a crew member on a preserved steam locomotive this past weekend. It was at the Maine Narrow Gauge Museum in Portland, ME. The engine was ex Monson RR #4, an 0-4-4 Forney built by Vulcan in 1918.
The hospitality, accommodation, and seafood in Portland were all great. The days were long and the work was dirty. Everything I wore was covered in coal dust, oil, and grease. That said, it was well worth the distance travelled and the effort involved in order to enjoy the experience. It was a privilege to be able to work with the various engineers, firemen, and museum staff.
If you get a chance to volunteer at a steam preservation line, please consider doing so. These pieces of history and the knowledge to operate and maintain them are slowly but surely disappearing. You may never get another opportunity.
An informal journal of various model railway projects.
I neither accept nor assume any responsibility for the results of actions by persons attempting to duplicate my efforts regardless of the methods employed. Always wear proper safety equipment and follow manufacturer's instructions for tool and material usage.
12.20.2006
10.15.2006
one day of progress
The September work session of the GTOn30 group went very well, with 80% of the group being able to attend. A hearty repast was enjoyed at the luncheon break, and a reasonable (and responsible) quantity of local beverage was consumed.
Over the day we managed to make some marked progress on Lynn's module set which consists of a three section, 12 foot long unit which makes a lazy S-curve over a wide river, plus a roughly 90° turn through a rock cut. All the temporary flex track used during the NGM show was lifted, the roadbed was repaired and/or re-aligned as necessary, and Mt. Albert sugar-pine ties were laid throughout. Micro Engineering code 83 rail was spiked in place were possible, however the bridge span was left bare in order to facilitate the reconstruction of the steel span to a higher modelling standard with added detail. A scenic re-assessment yielded the addition of some retaining walls below the track elevation and a drainage culvert. Further, our civil engineering member managed to finalise the position of the bridge piers on the two approaches.
all work and no play...
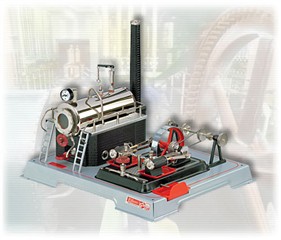
Nothing but excessive work of late. I did, however, get to operate a Wilesco stationary steam engine yesterday. It was great fun! The unit is very similar to their model D22 shown here:
Once a good head of steam is made in the small boiler, the twin cylinder, self-starting engine really whirls along at what I can only describe as a somewhat intimidating RPM.
The owner of this marvelous toy would like to make it into a self-propelled engine, in order to play around with "steam in the garden". Naturally, I think that's a capital idea and volunteered to assist in the process as time permits.
8.05.2006
the LGB Forney project
Some time ago, I was asked if I could narrow an LGB Forney from 45mm gauge to 32mm gauge, in order to better represent the 2' gauge appearance of the prototype. I said yes, but the project languished on my workbench for a lot longer than I ever intended. I did manage to locate a suitable, smaller diameter motor and make measurements (and some plans) for the conversion, but never actually got to it for various reasons.
So this weekend everything came together for a start. I've narrowed both wheelsets on the rear truck to the proper gauge, and am proceeding with the manufacturing of a new truck bolster. Removing 13mm width on the trailing truck and power chassis is going to be a chore; but seeing if the loco manages to walk on it's new "high heels" is going to be something else entirely.
Shown here are one each of the modified and stock wheelsets. Note the flange depth on the narrowed set has been reduced to about .072" from .120".
Here is the truck with the new (brass) bolster partially completed. Holes for the sideframe attachment screws and kingpin still need to be drilled at this point.
7.10.2006
Fast Tracks
One of the biggest things to hit the hobby in some time is the Fast Tracks turnout fixture. Fast Tracks website Having one of these units allows you to make highly accurate turnouts in one particular scale and gauge (a separate fixture is required for each frog number - i.e. an HO scale, 36" gauge, #5 fixture makes only that size of turnout - but you can make left or right-hand models).
I have finally had the chance to use one of these fixtures to fabricate an S scale, standard gauge, #8 turnout. All of the rails are in-gauge and the test truck rolls very freely through both routes. Super. Will it change the way I build my turnouts? Yes!
They aren't cheap, but if you consider the cost of good quality commercial turnouts a fixture would pay for itself in short order. Even if you don't spring for a fixture, you might want to consider their frog-and-point filing jig to create the proper angles on those particular rail segments. As an added bonus, the website has downloadable, correctly scaled reference drawings for most frog angles in most scales.
Note: This isn't an ad (or even a useful review), and I don't get a kickback from FastTracks for mentioning their product.
5.20.2006
Free-Mo (S and On30)
It looks as if we made enough of a favourable impression with our S scale Free-Mo layout that it warranted a mention in the Editor's Notebook section of the June, 2006 issue of Railroad Model Craftsman. I can't express how wonderful it was to see that write-up in print, especially in that magazine.
There was also an inquiry for our Free-MOn30 modular group to exhibit at the 2007 show in Copetown, Ontario. For that to be successful we'll need to make some significant progress on the modules themselves in terms of scenery...
Free-MOn30
The modellers in this region have not previously produced or displayed a Free-Mo style modular layout (except for a hybrid arrangement from the Ottawa area). However, the showings at Copetown (S) and Schomberg (On30), seem to have stirred some local interest in the format itself - if not the scales or gauges modelled. I would not be at all surprised to see more than one HO Free-Mo at an upcoming show.
In looking for Free-Mo standards for S scale, I did come across the following Yahoo group Free-MoS. There aren't many members yet, but at least it's a place to go and discuss the future possibilities.
4.25.2006
Narrow Gauge Madness
The show has come & gone. From all reports it should be counted as a success. Not bad for a first effort on the part of the "Narrow Gauge Madness" crew. The website for the event will have pictures of layouts and contest entries fairly soon.
Our fearless leader drawing door prizes about midday. About a dozen of the participants donated books and kits for draw prizes.
The vendor area seen from the entranceway. The local Lion's Club provided catering services for the day's activites. The smell of barbequing hamburgers, hotdogs and sausages was enticing.
The vendor area seen from the rear of the 1st floor. Quite a good selection of materials; we had restricted the vendors to bringing only narrow guage or gauge-neutral items (tools, scenic material, books, wood, plastic, metal, kits and RTR equipment).
3.19.2006
GP7
Just finished a decoder installation in an Atlas GP7 (N scale). The decoder recommended was the NCE N12SR. It is, in fact, bigger than I would like. You have to mill away a significant portion of the frame in the short hood area to permit both it and the headlight LED to fit inside the shell. Even so, the LED body had to be ground down for clearance. 1/4W, 1K resistors were installed to limit current on the LEDs.
I would have liked to use the Lenz LE0511W or the new NCE Z14SR instead, along with a pre-milled frame from either Aztec or Southern Digital. Oddly enough, at the price they sell their frames, it's more cost-effective than using my own mill (though not as convenient).
One oddity was the refusal of the F0F/F0R to work as intended. The lamps would always come on opposite to the direction of travel, regardless on the NDOT setting in CV29. The decoder also refused to take a function remap of the WHITE and YELLOW leads using CV33 and CV34. I ended up swapping the WHITE and YELLOW leads at the decoder itself to straighten out the issue.
I will say that the NCE decoder makes for smooth running.
2.26.2006
debut
The S scale modules made their first public appearance this weekend at the annual Copetown Train Show. This is a well-attended event that traditionally features items of a scratchbuilt or highly detailed and modified nature.
From what I have been able to ascertain, we made a favourable impression on both the general public and our fellow exhibitors. The seven of us managed to field just over 90 linear feet of standard gauge, Free-Mo style modules for our premier. I'd have to say this effort has taught us a lot, and will help to ensure that the next show is even more successful.
The CNR Mogul locomotives stole the stage, especially #923 with its Tsunami sound module installed.
2.14.2006
module madness
One end of the 3-section module currently under construction for
the S Scale Workshop.
The other send of the set. It is a 9'-9" long S curve with minimum 52" radii joined with easements. One #8 turnout will lead to a sugar-beet loading facility. The primary route is through the diverging leg of the turnout.
2.12.2006
better late than never
Very, very high workload since the beginning of December. Real life once again pushed aside more interesting pursuits. There's light at the end of the tunnel, but it's still a bit faint. Finally have a moment to update this 'blog.
First priority is continuing work on the S scale module for the upcoming annual Copetown train show. The plan is simply to provide operating trackwork at this point, as pressing matters are limiting the time I can spend on the project.
The module set (9'-9" OAL) is taking up the majority of the living area. Photos to follow as progress warrants...
Subscribe to:
Posts (Atom)