I've expended quite a bit of skull sweat in recent weeks, trying to sort out a few nagging issues and make some concrete plans for the future. The bottom line is that there are only so many hours in the day to pursue your interests; more numerous lines of inquiry means less time is available to spend on each one in turn.
Most of the work I've been involved with this year has centered around someone else's layout or models. This, in itself, is not a bad thing. However, it means that my own modelling progress would be considered glacial at best.
In an effort to make more headway, I've taken the advice of a fellow modeller and put a substantial number of items on the back burner indefinitely. Hopefully this action will permit me to focus more on my two primary areas of enjoyment; transition era S scale standard gauge and steam era On30 - both with modular groups in this region.
In the last week I've managed to clean all of the non-brass DCC installations off my workbench and make some small headway on the CAD work for a set of kit assembly instructions.
With generous help and browbeating, I've also made a great start on a set of module frames for the S scale project. These require some further tweaking and a great deal of terraforming but I'm very pleased with the progress.
In a fit of unexpected energy and determination, I even dug out the shell of a long set-aside diesel and began modifying all of the elements which had been bothering me about its overall appearance. Still more work to do...
11.20.2005
11.06.2005
vicarious railway
Progress towards any sort of model railway layout of my own is glacial at best. I am fulfilling some of my desires in the hobby by both working on and operating other people's layouts. A few benefits to this approach readily become apparent;
1) I don't have to pay for any of the materials,
2) I get to experiment with many different construction techniques,
3) I don't have to re-stage all of the trains at the end of a session, and
4) the mess is always at someone else's home :-).
There are too many fascinating aspects of the hobby to permit indulging in all of them in one person's lifetime. So far, however, the vicarious path is allowing me (or will shortly allow me) to participate in Maine-inspired 2', Swiss electric, turn-of-the-century branchline, modern unit train, large scale industrial, and several fallen-flag representations in varying degrees of accuracy and complexity.
This region seems to be particularly blessed with modellers of superior skill and widely ranging interests; sort of a railway cornucopia. I don't think I could have deliberately chosen a richer area in which to pursue the hobby.
10.17.2005
current projects
A few more DCC installs are in process. A CPR D-10 in brass (PFM), a Spectrum Doodlebug, and a P2K GP38-2. These will keep me busy for the rest of the week at least.
The brass loco will prove to be the most time consuming. Electrical pickup is poor at best. Extra wipers will need to be added where possible, and the motor will have to be isolated from the chassis.
There should be just enough room above the motor to fit the decoder in the cab itself, rather than resorting to a tender installation.
doesn't take long...
...to get behind with progress reports and postings.
There certainly has been a lot of activity over the summer, most of which has had nothing to do with model trains or machining. However, now that autumn is upon me, these activities have picked up significantly.
As a matter of fact, there are now TOO many projects to give appropriate attention to each one. That means some of them will have to get refused, or put on the back burner indefinitely.
9.08.2005
outside the enginehouse

Sonjora Branch of the D&RGW.
A small scene in the Rio yard of Dave Burrough's fabulous layout. Car card operations on this pike are enhanced by flawless mechanical operation, a PFM sound system, and hands-free switching thanks to Kadee magnetics throughout.
9.07.2005
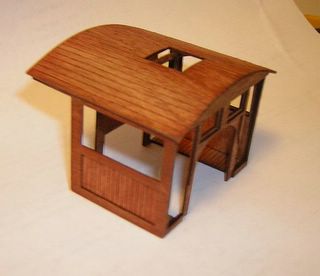
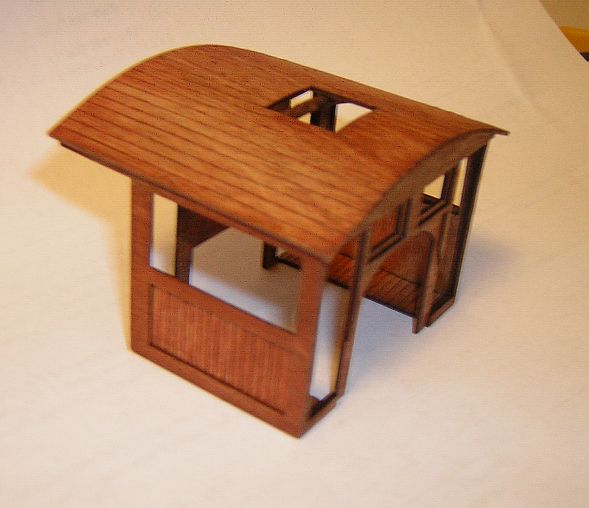
logging caboose
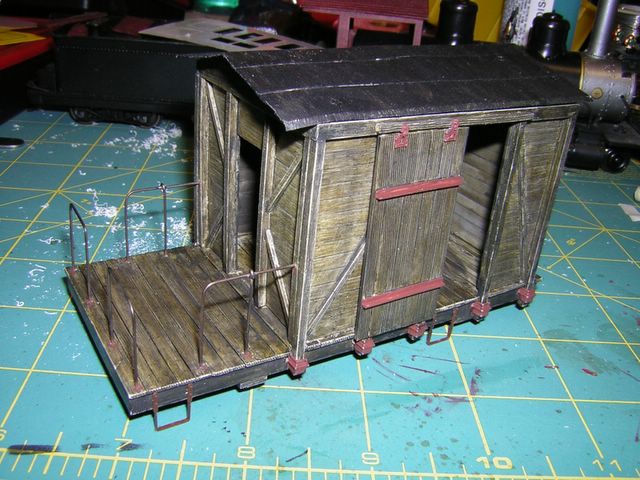
This was made from styrene following Pete Moffett's plans from the July 1988 NMRA Bulletin. It is an O scale, standard gauge logging caboose with Grandt Line detail parts and piano wire railings. I made this as a present for a friend on the west coast when he donated a quantity of On30 materials that he was no longer using.
operations
This week and next I will be participating in four operating sessions on a variety of local layouts ranging in timeframe from early to late 20th century. Some will be signalled and others will be train order and/or timetable with car cards. All will have multi-person crews for each function (at least engineer + conductor/brakeman).
The lure of operations over simply "running trains" is sometimes difficult to convey. Modelling a feasible (or actual) rail system and it's purposeful movement of goods can present significant challenges unless the layout is designed from the start to support this activity. In the end, I feel it adds measurably to the overall enjoyment of the equipment and layout.
The lure of operations over simply "running trains" is sometimes difficult to convey. Modelling a feasible (or actual) rail system and it's purposeful movement of goods can present significant challenges unless the layout is designed from the start to support this activity. In the end, I feel it adds measurably to the overall enjoyment of the equipment and layout.
WWI + industrial
I've finally received the two major books on WWI trench railways that I've been trying to locate for some time. "Narrow Gauge to No Man's Land" by Richard Dunn and "La Voie de 60 Militaire de la Guerre de 14-18 en France" by Dr. Christian Cénac. These are terrific reference works that greatly expand upon the contents of "Narrow Gauge at War" volumes 1 and 2 published by Plateways Press. Dr. Cénac's book is nearly 400 pages with many scale drawings (1/35) and illustrations.
Even more drawings and photos of WDLR equipment can be found in recent issues of "Narrow Gauge and Industrial Railway Modelling Review" magazine published in the UK. This magazine is a must-have for critter enthusiasts and those desiring detailed information of industrial operations and equipment.
Even more drawings and photos of WDLR equipment can be found in recent issues of "Narrow Gauge and Industrial Railway Modelling Review" magazine published in the UK. This magazine is a must-have for critter enthusiasts and those desiring detailed information of industrial operations and equipment.
8.23.2005
Mogul + stain pen
The smokebox and stack have (finally) been repainted a graphite colour obtained using a mix of Polly Scale stainless steel and engine black (~80/20 ratio).
The cab received a few thin coats of E/L Maroon, which have given it a dark red cedar tone without totally obscuring the grain. The cab interior remains simply the Floquil rosewood wash. The doors and other parts will need to be matched before they can be installed.
On another note, I found a "Scratch Fix" pen that I picked up at Home Depot a long time ago and had forgotten about. It appears to contain stain in an alcohol base; like a standard marker. The contents are "black-brown" and give stripwood a nice, fresh crosstie colour. I must remember to see if HD still has these in stock, as I recall quite a range of shades were in the display stand.
8.16.2005
latest venture
I've just started doing decoder installations for a local hobby shop. As you can imagine, very few people are asking for external assistance to drop in a PnP decoder. This means that the vast majority of work I will get from this source will be the most troublesome types.
For instance, my very first task was to stuff a DZ123 decoder into an N-scale, Kato Heavy Mikado. This has a split frame pickup like many other N-scale products. Luckily there are some basic directions from others who have done this before; however I have come to disagree with some of the steps in their process description - I'll address the deficiencies next time I have to do one of these Mikes.
All that aside, this first unit is back together and tested. I must say I'm fairly impressed with the operation of recent releases of N scale steamers. They certainly aren't like the ones I used to fight with to get running...
7.13.2005
MRC sound + Bachmann Mogul (part 2)
MRC decoder #0001627 (~ $90 CAD)
Just finished installing one of these decoders in the Bachmann Mogul. It's a decent sounding unit, which I bought primarily for the chuff; it is less mushy than most that I've heard. It includes a 28mm, 8 Ohm speaker and is apparently capable of driving two speakers of this size.
It has headlight/reverse light, basic motor control (no BackEMF or high frequency PWM) with programmable accel/decel & start voltage, and 12 audio functions.
At the moment, I'm having some difficulty getting the chuff rate set with respect to driver RPM. There is no way to use a sound cam with this decoder.
Volume can be controlled only to the extent of loud, quiet, and off.
The speaker was installed in the tender facing downwards. The decoder was also installed in the tender with all wiring except the yellow reverse light passing forward into the locomotive. A slot was milled in the right side of the chassis casting to route the wires to the motor, pickups and headlight.
The Mogul itself is far from complete, with many more details to be re-applied and new ones created in order to alter its appearance.
inspirations
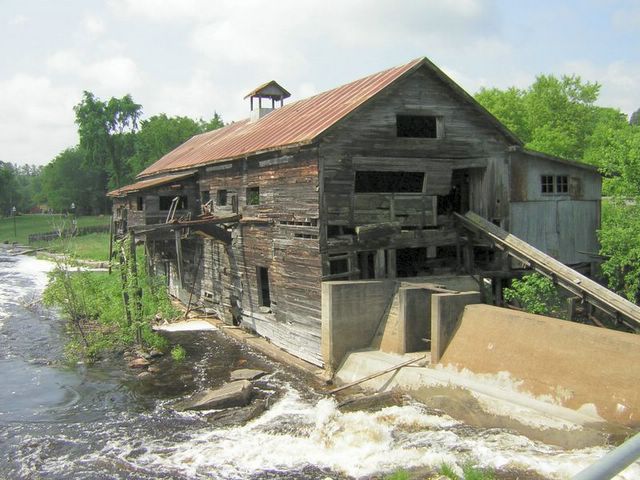
A recent trip to Kinmount, Ontario offered some interesting sights.
First, the former Craig & Austin sawmill building in Kinmount. At one time there was a slash burner in the middle of the river on a stone foundation. Sadly, this is long gone. The mill itself is a good sized prototype to model.

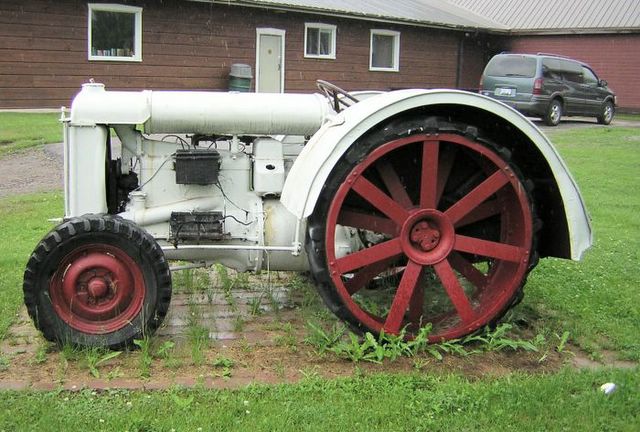
Second, a small Fordson tractor at the museum in Minden. This museum has several historic buildings which were relocated to the site, including a church, schoolhouse, log home, and bank.

First, the former Craig & Austin sawmill building in Kinmount. At one time there was a slash burner in the middle of the river on a stone foundation. Sadly, this is long gone. The mill itself is a good sized prototype to model.
Second, a small Fordson tractor at the museum in Minden. This museum has several historic buildings which were relocated to the site, including a church, schoolhouse, log home, and bank.
6.30.2005
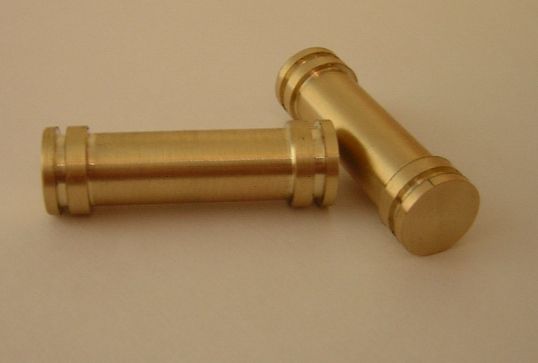
1/2"n2
One of the oddball combinations I'm working in is 1/2"n2. To assist with tracklaying efforts, I made up a set of brass roller gauges and a small, 3' wheelbase bogie frame.
The roller gauges were set up for code 100 track and .080" flangeways. In practice, the .080" flangeways are too wide. Despite the fact the scale is relatively large, the wheels that will be employed are bigger HO or medium diameter S scale with an RP25 contour. The gauges will have to be modified for a narrower flangeway.

The wheelsets on the test bogie are Jaybee 36" diameter (HO) with pointed axles. The axles were cut in half and a section of brass tubing was slipped over the stubs to widen the gauge to 1". The frame consists to two flat plate sides with a solid rod spacer at each end fastened with 2-56 screws. The sides are fitted with Markits (Romford) needle bearings for the axles.

The sides were ACC'd together and milled to length. Then the bearing locations were marked, centre drilled, and drilled 5/32". The bearings are held in place with Loctite 242. They slipped into the holes without passing completely through the plate frame. The frame will free-roll down less than a 1% grade.
Motive power for this project will be a 4-wheeled electric trolley with a (non-functioning) pantograph. The chassis will require a 3-point suspension to ensure electrical pickup from the rails.
The roller gauges were set up for code 100 track and .080" flangeways. In practice, the .080" flangeways are too wide. Despite the fact the scale is relatively large, the wheels that will be employed are bigger HO or medium diameter S scale with an RP25 contour. The gauges will have to be modified for a narrower flangeway.
The wheelsets on the test bogie are Jaybee 36" diameter (HO) with pointed axles. The axles were cut in half and a section of brass tubing was slipped over the stubs to widen the gauge to 1". The frame consists to two flat plate sides with a solid rod spacer at each end fastened with 2-56 screws. The sides are fitted with Markits (Romford) needle bearings for the axles.

The sides were ACC'd together and milled to length. Then the bearing locations were marked, centre drilled, and drilled 5/32". The bearings are held in place with Loctite 242. They slipped into the holes without passing completely through the plate frame. The frame will free-roll down less than a 1% grade.
Motive power for this project will be a 4-wheeled electric trolley with a (non-functioning) pantograph. The chassis will require a 3-point suspension to ensure electrical pickup from the rails.
6.25.2005
hunter/gatherer efforts
Smoky Bottom does have the jeep-o-motive conversion kit. One should be on its way from overseas in short order. The Australian War Memorial Collections Database has a search for information which returns several interesting photos of the prototype using the terms "railway jeep".
Jerry Wilson has produced several S scale resin cab, stack, and dome sets for various 2' gauge locomotives. These are designed to adapt MDC HOn3 2-8-0 kits to represent
either Mogul or Prairie wheel configurations. I've ordered a set for 2-6-2 #15 and am looking forward to receiving these parts next week. Expect a construction article from Jerry in one of the major MRR publications shortly.
Mike Brown Solutions has drawings for 1 and 3hp single and dual cylinder steam engines capable of doing some serious work. They also have informative (if "quaint") videos showing boiler construction and co-generation basics. Their "Steam Package" video and drawing set is reasonably priced and delivery was rapid.
6.23.2005
I've got no strings...
I've finally had a chance to hook up the UR90 InfraRed receiver panel from Tony's Train Exchange (excellent service) and test the UR4 utility throttle I picked up at the Credit Valley Railway (terrific local hobby shop).
I noted a slight delay in some of the command transmissions, but nothing to worry about so far. My test setup emulates a fascia mount with the UR90 at hip level. This is not an optimal arrangement for picking up line-of-sight signals. Ideally the panel should be higher up and father away, nearer to a theorectical backdrop plane in order to receive signals from a wider arc.
The setup requires a 12VAC wall-wart for the UR90 panel and a 9V battery installed in the throttle itself. It's a simple and inexpensive way to go wireless now that the basic Digitrax throttles come with IR functionality included. For an around-the-wall layout, you'll likely need more than one of these receivers to provide adequate coverage for all throttles.
Mogul cab
Well sir, I don't like it. The Rosewood stain just isn't "taking" the way I would like it to on the laser-cut wood.
a) I missed sanding a couple of the edges of the parts to remove the thin layer of blackened wood. This carburised surface doesn't accept stain or glue very well.
b) The grain is a bit too coarse, and the wood doesn't seem to be very porous. The stain likes to sit on the top surface. Perhaps the stain in the bottle has lost its effectivity...
The cab is simply going to get a couple of coats of E/L Maroon to match the future passenger equipment.
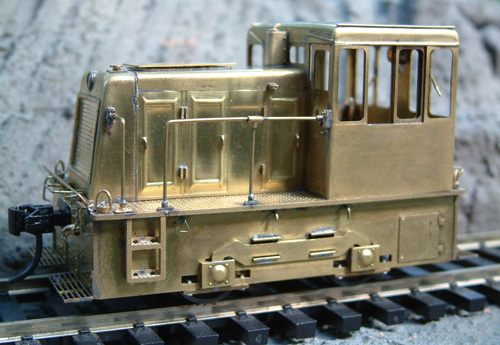
fabulous On30 loco
If you like industrial operations, you owe it to yourself to check out Rich Yoder Models 25T GE end cab.
This little critter runs extremely well, is nicely weighted, and is priced right. There seems to be plenty of room for an audio decoder and speaker.
I just received mine in the post and I'm very glad I elected to buy one.
This little critter runs extremely well, is nicely weighted, and is priced right. There seems to be plenty of room for an audio decoder and speaker.
I just received mine in the post and I'm very glad I elected to buy one.
6.16.2005
Mogul progress
Despite being away from the workshop for several days, a small amount of progress (both good and bad) can be said to have been made.
1st - Don't try to remove the smokebox number plate without a big piece of tape hanging off it to keep track of it's inevitable movement. I still haven't found it since it popped off the front and bounced off the ceiling and several dozen bits of furniture. Now I'll have to turn a new one on the lathe.
2nd - It's a shame that Floquil's stains are no longer available. I have a bottle each of Rosewood and Pine that I'm hoarding until I find a good substitute. The Banta cab has received several washes of the Rosewood and, if it looks OK, will get several layers of gloss applied. Otherwise it will get the Polly Scale E/L Maroon and Glosscote finish.
6.08.2005
MRC sound + Bachmann Mogul
After hearing a demo of the MRC synchro sound decoder, I decided I had to have one. The size of the decoder and speaker renders it nearly impossible to install in either of the On30 Porters. The Mogul, however, has a huge tender and is relatively easy to disassemble.
The Mogul is getting a facelift in the proceess of the installation.
- Cal Scale brass smoke stack
- Tomalco brass tender hatch
- Banta laser-cut wooden cab
- new paint job
All of the piping and accessories have been stripped from the boiler and it has been primed Polly-Scale MOW Gray and then Engine Black. A layer of Testors Glosscote will cover the black to represent the spit-and-polish expended when a road is still new (and solvent). Due to excessively rough handling by Canada Post during the Mogul's trip from BC to Ontario, a number of details must be repaired/replaced on the loco and tender. Luckily, none of the damage affected the running qualities.
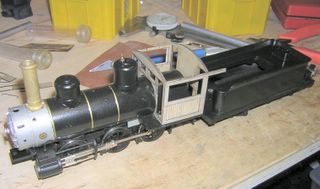
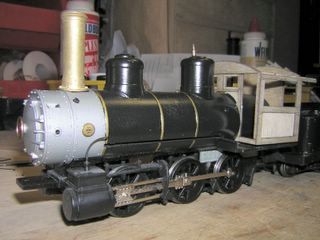
As usual, the camera doesn't lie and shows off the flaws in the finish. Still more work to do on the boiler and stack. The smokebox also needs several touchups as the masking tape unexpectedly pulled off some of the factory graphite finish.
It's also obvious that I require some seriously improved lighting capabilities if I'm going to take decent construction photos.
simple kit modification
Dad has been keen on getting an MDC 4-4-0 kit since it was announced some time ago. He has quite a few Roundhouse engines including 3-truck Shays that he's built over the years. Luckily he was able to recently obtain one of the kits from a dealer in Seattle. Only a few of them ever made it to Canada before Hroizon bought MDC and kit availability dried up overnight.
The kit, as designed, seemed to be a representation of an American built under license somewhere in the US. As he was looking for a more original 1882 appearance, we had to at least modify the most visible feature; the running boards.
The boards were split on the engineer's side to allow for a large air reservoir and on the fireman's side to make room for a twin cylinder air compressor. Engines like the GTW examples built in Düb, Scotland were equipped with continuous boards. The elevated centre section on the engineer's side had to be carved off the boiler without destroying the two boiler bands that passed right through the piece. Mounting pins for both the air compressors and the reservoir had to be shaved off as well. The resultant gaps in both running boards were filled with .040" styrene plates filed to match the edge profile.
The simple alteration of the running boards and the removal of the mullions in the forward cab windows make for a big change in the appearance of the engine. A single lung pump will be added to the fireman's side above the running board, very close to the cab front. Short air reservoirs are mounted outboard under the floor on both sides of the cab.
The typical practice of building a kit precisely as the instructions dictate should be discouraged. In its place, the premise of building a model of a particular prototype using the kit as the starting point should be embraced. This simple change would alleviate much of the "sameness" that exhibition layouts are falling victim to.
6.03.2005
DCC out of storage
The GenesisII DCC system I purchased a number of years ago is up and running again. This discontinued Digitrax starter set had all of the features I was after at the time, and is still compatible with all of their current product line.
I downloaded the latest Windows software for the optional PR-1 decoder programmer, and quickly had my old Sn42 diesel running with directional headlights & acceleration factors in just a few mouse clicks.
I am aware that the new, JAVA based DecoderPro software coupled with the LocoBufferII is a popular choice for decoder programming via the PC and Mac using serial or USB ports.
Given the interfaces on most digital throttles, I cannot see using them to program more than a few basic CV values to get up and running. A computer offers a point-and-click interface that allows you to save & load profiles for fleets of motive power and draw speed curves directly on-screen.
jeep-o-motive
I've found several references to an interesting jeep conversion done by the US Army in certain theatres of operation to provide basic locomotion for rail equipment.
They took a basic 1/4 ton Willys GPW and replaced the rubber tyres with a suitable set of wheels for steel rail. Traction was apparently assisted using dry sand from sand boxes mounted fore and aft. I have found no mention of added ballast for traction, but it is expected that this was required.
Some related photos are available at Jeeps on the rails. Buzz indicates that once you lose traction, you have to bring the jeep to a complete halt in order to start it moving again.
Braking must have been accomplished using the manual train brake wheels on the rolling stock itself, as the jeep would lack the braking capacity to stop 10 or 20 tons of cars once they were rolling.
Word has it that Smoky Bottom Lumber Co. in the UK is offering a static plastic conversion in 1:35 scale for the Tamiya jeep kit. I am waiting to hear back from the company on price and availability. If I can obtain this product, a powered jeep and at least one piece of rolling stock will be built and a suitable diorama created to display it.
5.26.2005
back to the trains
Planning for the next On30 modular group "build session" is underway. We have not decided upon which DCC system we will be using for exhibitions. The decision to go wireless was very easy; the benefits are worth the initial expense. However, each of us has a different ideal throttle configuration.
I am a Digitrax user. I prefer their UT series "knob-and-switch" throttles. Not the most robust construction, but certainly adequate to task. The new UT4 & UT4R have full function control and 4-digit addressing. For programming I always try to use the PR-1 programmer PC interface.
I have used Lenz and find it very nicely built. Both of their pushbutton and knob style throttles are fine and feel comfortable to use. The CVP radio throttle add-on system for Lenz is OK. I found the narrow handheld a little uncomfortable, but I suspect that some trimming of flash on edge the plastic casing will soften it up. Not having used NCE or Atlas, I cannot yet comment on their "feel".
I've also had the chance to use old carrier-based CC systems like Keller OnBoard and PSI Dynatrol. The PSI throttles with full train-brake simulation are a real treat. I don't know how well they've implemented that feature now that they offer a DCC compatible system.
I'll bring the Digitrax setup to the next build session and let the other members have a go with it. The plan is for each of us to buy one radio throttle (for whatever system we decide upon) and split the cost of a receiver panel 4 ways.
5.20.2005
fortune smiles (gearing)
I was in luck yesterday. A spontaneous trip to a not-so-local hobby shop yielded a selection of NWSL components at very low prices. Two such gems were re-gearing kits for HO MDC steam locos. These are 72:1, compound reduction designs (sans gearbox surround). The gears are intended to drop into the MDC die-cast chassis, replacing the stock set. Low speed operation and pulling power are greatly enhanced.
I will be using them for other projects than HO, of course. My dad is the HO modeller; I wander about in scale and gauge, era and theme so much that I no longer say, "I'm in X scale", or even, "I'm a Canadian National modeller".
The other source I patronise for gearing is Ultrascale in the UK. They carry (and will produce) a wide selection of gears up to 100dp. Another promising vendor with gearboxes up to 108:1 reduction is High Level Kits who have, so far, remained unresponsive to my inquiries. Perhaps my requests have been lost in the ether.
I must remember to pick up some 3mm and 3/32" oil-hardened drill rod for larger axles and shafts. The 1/16", 2mm, and 1/8" stock on-hand will be sufficient for smaller applications. The practice of substituting 2.4mm stock for 3/32" works fine, as the dimensions vary just over 1/2 a thou, which should not affect a press fit in this case.
5.12.2005
On30 module (part 3)
The ditches have been formed, the cork roadbed is in place, and the sugar pine ties have been laid. A slight dip just before the bridge will have to be corrected before ballast is applied or rails are spiked. I was able to determine that the original alignment included an 18" radius, rather than 22" as I'd hoped. This will limit some of the equipment that can operate on the module.
A few observations:
a) The expanding foam-in-a-can is NOT hotwire friendly,
b) do not apply plaster prior to your hotwire work,
c) wear static-free clothing while carving foam, and
d) make the top layer from a single piece if possible.
The cork is being fastened with No More Nails adhesive and has been pinned in place while it sets. A single 5" wide piece of Mid-West cork yields 12' of 1-1/4" wide strips that will bend around an 18" curve. If I recall correctly, one piece of 5" wide sheet was cheaper than 12' of bevelled HO roadbed.
5.11.2005
a note on gears
Do not discount "other" hobby factions when looking for model railway components. For instance, I found what I hope to be some suitable 64 dp aluminium gearing in a shop catering to R/C car enthusiasts. The prices were reasonable and the selection quite surprising. Large scale modellers would certainly be able to utilise gears in the 48 or 32 dp range which are also available.
The gears are designed with a hub and grubscrew for fastening to the shaft. I will have to face the gears down in thickness to reduce their space requirements. I will also eliminate the hub and aim for a press fit on the shafts.
If the loads are sufficiently low, plastic gearing intended to repair R/C servos could be employed. Sets are available in a bewildering array of choices. Given their intended application as torque multipliers in a servo, the ultimate reduction would be quite high.
hold the phone
Looks like my personal projects are getting put on hold. It seems that several people suddenly want model railroad items built or modified. In the last 7 days I've been told to go ahead with 5 tasks that have been, up until now, merely hypothetical.
Am I pleased? Certainly! This bodes well for the future.
One is a particularly large endeavour; 1:22.5 to be exact. Two more are CAD projects for a model railway kit manufacturer. The remaining pair are repair/rebuild issues dealing with 1:64 scale items.
Am I pleased? Certainly! This bodes well for the future.
One is a particularly large endeavour; 1:22.5 to be exact. Two more are CAD projects for a model railway kit manufacturer. The remaining pair are repair/rebuild issues dealing with 1:64 scale items.
On30 module (part 2)
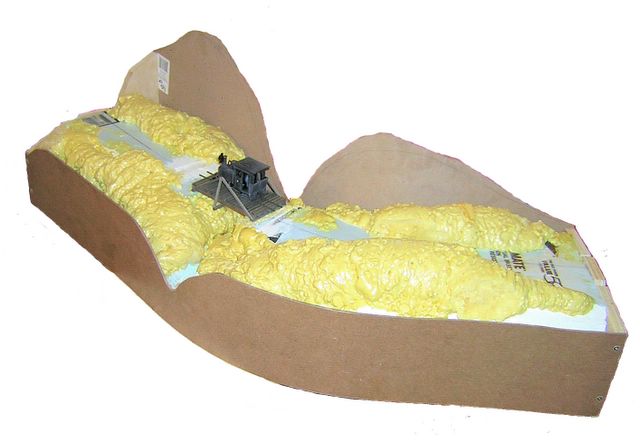
The inside fascia is now on the module. A wavy profile was cut into it to encourage steep hillsides and their associated scenic necessities. Since the module is intended to be viewed from either side, the high vantage will make for an interesting viewpoint.
In honour of a memory which is fading and mellowing with time, I have decided to call the module "Whisky Creek". I am using the Scots spelling of the word, so please don't email or comment telling me I've left out the "e". I have nothing against Irish tipple; I enjoy Redbreast and Black Bush whenever the opportunity arises. While it bears little resemblance to the actual location of my childhood, I'll always recall a pleasant vision when I say the name.
As mentioned before, this module is a bit of an experiment. It is being formed "inside-out". The foam was cut and shaped prior to the addition of end plates or fascias. There will be some compromises in its construction due to an undeniable lack of planning. That I am able to salvage this unit from a previous set of trials is a bonus.
I have some concerns in terms of robustness due to the odd way in which it is being built. The main worry is the long-term stability of the end plate-to-fascia joint. This is made using only two or three #8 x 1-1/2" particle board screws (Robertson head, of course) at each end. It may be possible to notch the foam to make sufficient space to retrofit inside corner blocks for stiffening.
5.04.2005
narrow gauge turntable drive

Part of a turntable mechanism built for a good friend. The pivot is a 1/4" mono phone plug and jack combination. A brass bushing was made to accept the cable end of the phone plug, and a nylon gear was bored out to fit the outside diameter. A brass plate to support the superstructure (built separately) was affixed to the top of the bushing. Power fed from the tip and ring contacts on the phone jack allows for sound equipped locos to remain uninterrupted throughout the turntable rotation. The wires are run from the plug solder tabs up to the rails inside the bushing body.
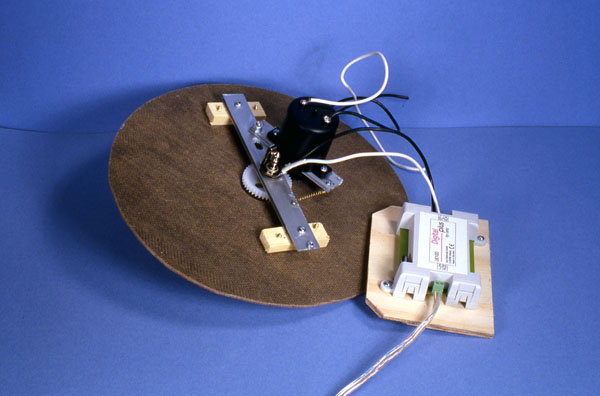
The turntable is powered by a Switchmaster stall motor mounted on a spring loaded swing arm. The spring keeps the stall motor pinion gear in mesh with the bridge pivot gear. The entire bridge can be removed from the top of the layout for maintenance or detailing by simply pulling upwards. A Lenz automatic reversing relay deals with the polarity change during rotation.
5.02.2005
current project (part 1)
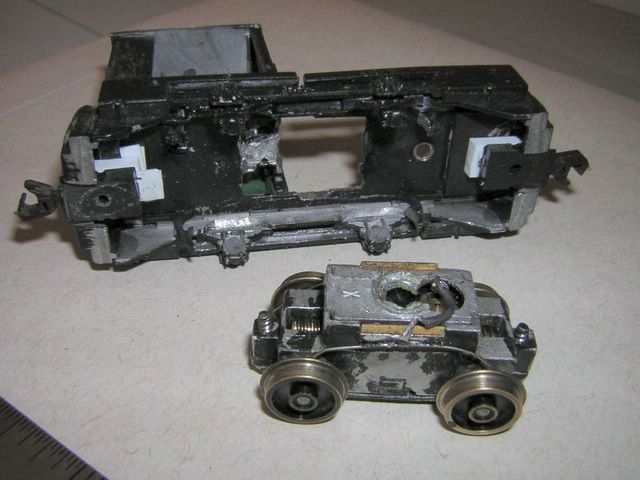
When I can manage to get the link up and running, I will have a honey of a Current Project to share. It's a devilish little 0-4-0 infernal combustion loco kit that has seen better days. At some point it might have been an adequate runner, but that is not longer the case.
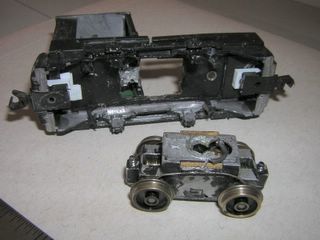
The motor and gearbox design would be fine if the whitemetal castings hadn't worn away around the axles. Now the gears do not stay in mesh. When they do decide to connect, it jumps and bucks like a startled deer. There is no slow speed control due to the negligable reduction in RPM through the use of a terribly small diameter worm wheel. Slow speed running will have to be addressed during the rebuild.
I have an idea that will increase the gear ratio, provide a 3-point suspension, and permit the addition of a small flywheel. This will involve a complete chassis fabrication, but it will be well worth the effort in terms of performance and reliability. Further bulletins as events warrant.
4.29.2005
On30 module (part 1)

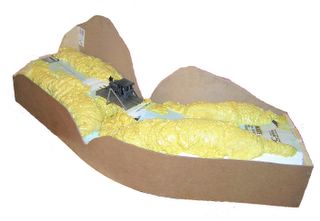
A partially completed On30 module. Currently missing the inside radius fascia and matching foam contours at the back hill area. This module is partly experimental, as I hadn't previously used expanding foam for anything other than sealing gaps in walls. The foam did not prove to be a cost effective way of forming organic contours (~$10 CAD for one can of foam).
This non-90 degree curve will only contain a Hunterline king's post bridge spanning a small creek, and some coniferous trees just below the ridge crests. Rail will be code 83 Micro Engineering spiked to Mt. Albert ties on top of Midwest 3/16"x4" cork sheeting cut into strips.
Once the other fascia is applied, pine cross pieces will be fitted on the underside to tie the structure together. The contours of the terrain will be cut out of the top edges of the fascia pieces using a coping saw with a medium blade.
The ends are 3/4" thick G2S birch plywood. They are cut to two specific profiles adopted by our local On30 modelling group. One is a flat with a 1:12 slope away from the track (and ditch profiles). The other is a fairly steep hillside.
4.28.2005
still going strong

South Simcoe Railway locomotive #136. Ex Canadian Pacific 4-4-0 built in 1883 (photo taken Canada Day, 1998). Short excursion runs from Tottenham northwards and return during the warmer seasons.
wiggly jiggly
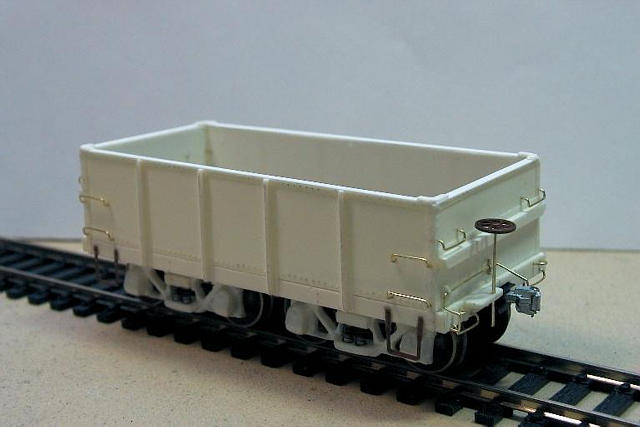
Moffett Models custom made this great Sn42 kit for the local Newfoundland modellers group. It represents a 25T ore car from the Buchans Railway (later ASARCo.) used to carry lead and zinc concentrates. The cars were known as "wiggly jigglies" as they were unstable at higher speeds.
An unfortunate mishap rendered the masters unusable for future moulds, and we wore out the initial RTV moulds making nearly 60 of these little cars. They are amazingly accurate, having been made from the original erection drawings. The kit included sprung (working!) Andrews trucks. The short wheelbase does make the cars act like the prototype; they do wiggle back and forth on the track.
The wonky looking grab irons on this example were my attempt to duplicate the look of the original's oddly shaped fittings. My remaining units will be assembled slightly differently. Certainly none of the in-service units had metalwork that was this "pristine" and flat. I shall have to find a reliable way to "beat up and dent" the resin castings without rendering them unusable.
caught in the act
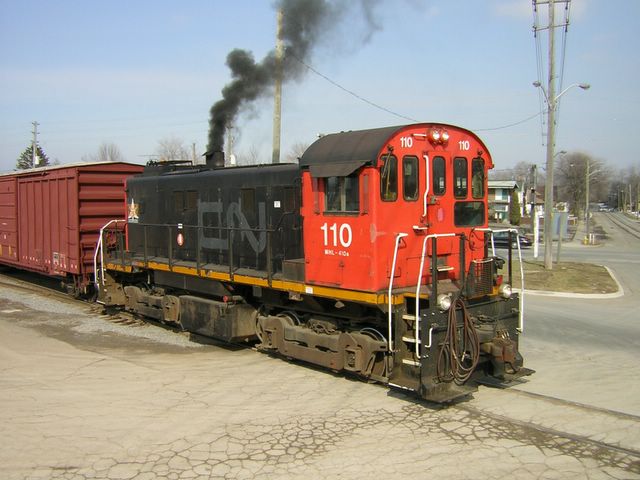
Trillium Railway #110 (ex CN S-13 1000hp) switching Interlake Paper on the Port Colbourne Harbour Railway in St. Catharine's, ON, March 2005. Accessing this customer requires street running up the tracks visible on the right. From the general reaction of the motorists on the roadway, this was not an everyday occurrence.
Two of us chased the short train (loco, 2 boxes, and a bright yellow caboose!) from road crossing to road crossing as it wound its way up the escarpment grades. My companion had just finished telling me that he'd never seen a train on this particular track section when it came into view. We didn't want to pass up the opportunity to take a few shots.
Of course, I didn't take any pictures of the other side of the loco. "Buck fever", I suppose.
4.27.2005
current personal project list
- A few Wrightlines/ABS 60cm gauge WWI kits in 7mm, including a protected Simplex and a type D wagon.
- Sn42 outside braced boxcar; a set of master patterns for RTV moulds.
- On30 2-6-2 Backwoods Miniatures select-a-kit on a Bachmann HO 0-6-0 chassis.
- Add motion to a static, whitemetal O scale stationary steam engine kit.
- On30 4-wheel logging caboose.
- Complete a long overdue S-scale Ridgehill Models dynamite shed.
Sold off the models of the WDLR prototypes in 7mm scale to another enthusiast. I'll make any such models in 16mm scale.
The Backwoods Miniatures kits were all sold off some time ago, so they are no longer on the plate.
The static model of the steam engine is likewise no longer around; traded for something else.
Will have to revisit this topic again...
preferred materials
Mt. Albert Scale Lumber (except for one type of Northeastern - the 3/64" z-brace) & Mt. Albert sugar pine ties. Evergreen styrene strips and sheet stock, including scribed panels of different widths. K&S brass rod, sheet stock, and "special shapes" will suffice for heavier work.
Ambroid Pro-Weld solvent for the styrene; Weld-Bond PVA for the wood. Pacer's "Zap-A-Gap" CA for other combinations of this-to-that. 63/37 solder and various 2-56 through 0-80 fasteners for the brass hold everything together.
For the most part, paints are Polly Scale acrylic. The odd Badger ModelFlex bottle is used when specific colour is needed. Weathering is done with Bragdon Enterprises powders and dry-brushed white paint. A couple of Floquil's wondrous, now discontinued (and terribly toxic) Flo-Stain bottles are hidden away for a rainy day. Paint is applied by sable hair brush or shot through an old Badger XF-150 double-action airbrush.
Dana Nield used to have a webpage called "the Tamiya Model RR Paint Project". It talked about using armour-modeller style underpainting and washes on railroad subjects. If anyone has that content archived, please let me know.
prototype Welsh locomotive

Ex Corris Railway 0-4-2 locomotive "Sir Haydn" on the 2'-3"gauge Talyllyn Railway (Nant Gwernol station), Wales, May 2004. The rake of coaches behind includes 1st and 2nd class cars and a baggage wagon. The TR is the oldest preserved railway in the world. I managed to convince my travelling companion that a side trip to Wales was only a short jaunt from Shrewsbury in Shropshire. Thus I was able to see this living relic first-hand.
On the way up to the peak, we disembarked at the Dolgoch station and hiked up to the very picturesque Dolgoch Falls. Given that time was short we (sadly) stopped for only a while before walking back to the station along a path that passed under the ancient stone railway viaduct, 50 or 60 feet overhead.
At Nant Gwernol, the engine ran around the train and re-coupled to the downhill end. The jovial conductor sat in our open compartment and spoke of the local history in a wonderfully thick, Welsh accent (possibly only put on for the benefit of foreign visitors). We made it back to Tywyn Wharf (which is not on a body of water - a "wharf" in this case was the old standard gauge interchange platform) on the final train of the day.
Due to our late return, we just missed the Honeyed Ice-Cream factory visit in Tywyn. This did not sit well with my travelling companion, who had been looking forward to (and had been promised) the treat. I, however, was somehow looked upon with great favour and was gifted a shard of the slate roof of the original station circa 1865 by one of the historical society members. This was made possible due to the construction of the new museum building that will adjoin the old station, where some material had been dislodged in the process. I was (and still am) really pleased with this unforeseen present.
nickel-silver chassis

O-16.5 Talyllyn 0-4-2 chassis (Branchlines). The trailing bogie and the rear axle share some compensation via a 3-point pivot arm. In practice, however, the range of motion appears somewhat limited. A can motor drives the rear axle through a worm reduction. Pulling power is enhanced by the weight of a whitemetal superstructure.
This was quite a "trial by fire" for me as I had not undertaken assembly of a British kit before. The manufacturers do expect you to have a certain level of knowledge of their local prototypes; a fact emphasised by their omission of "obvious" information that would assist the neophyte.
At this stage the siderods and main rods had not been fitted. The unit had to be disassembled to install the motor and gearbox. The gearbox rides with the driven axle, so the worm stays in mesh at all times.
The kit is simplfied due to the prototype having "inside" valve motion which is hidden from view and therfore not included in the fretwork or castings that need to be assembled.
brass "wooden" cab
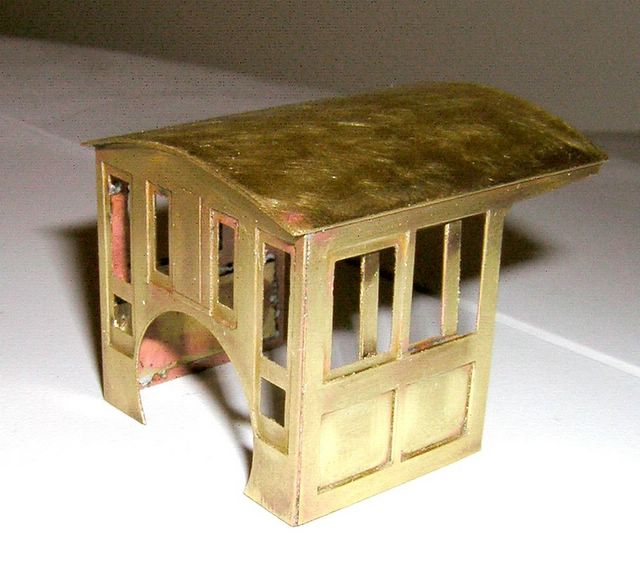
S scale, C-16 cab from Echo Mountain Models. Inner window frames are tacked in place until I decide on a method of making them slide. Roof was re-made using thinner sheet than was provided in the kit. Visible pinkish patina is heat discolouration from the soldering tips.
I've been researching different soldering techniques and materials. After all, resin core solder is typically designed for electronics applications rather than assembly of thin brass sections. It seems that the best UK practice is to use a mid-range (145-150 degree C), non-flux cored solder and liquid acid flux (i.e. phophoric) for this type of material. I will have to see where I can locate these items locally.
4.26.2005
new tool shakedown
Picked up a resistance soldering unit (American Beauty 100W) on the weekend. Tried it out on some scraps of brass, then set forth assembling an Echo Mountain Models S-scale, round roof C-16 cab that I purchased (on spec) some time ago.
I noticed a major improvement in the ease of assembly and finished quality of the kit compared to my efforts with the Meridian Models quarry wagon. From brief examination of old photos, the cab appears to be appropriate for RGS #9. If I can locate the proper plans for this locomotive I may attempt to construct an Sn3 engine. Given the amount of information available for the Colorado roads, this shouldn't be too much of a chore. I just have about a hundred other projects to tackle first.
get shorty

Scratchbuilt, 4-wheeled On30 car on a handlaid 9" radius turnout following Geren Mortensen's (The On30 Guy) industrial trackage templates. Rail is code 70 Micro-Engineering. The car is built upon a modified heavy-duty, MDC HO passenger truck frame. See Jack Hess' articles in Light Iron Digest Volume 4 Issues #3 & #4 for construction suggestions.
The truck would not pass through the diverging route unimpeded without the addition of a guard rail adjacent to the curved stock rail. The point rails are curved through the frog to make this tight turnout possible. Definitely the place for slow speeds and reasonably weighted cars.
a thing of beauty...

...is a joy forever. A selection of largely scratchbuilt models in 1:64 (S) scale of Newfoundland 42" gauge prototypes. ASARCo., Buchans, GFCR, and CN/NR railways are represented in this display at the Maple Leaf 2003 NMRA convention, Toronto, Canada.
hen's teeth

A very, very rare sight. Two WWI vintage protected Simplex locomotives in operational condition. Powered by 7 litre, 4-cylinder petrol engines yielding 40hp. Leighton-Buzzard Light Railway "Twin Turtles Day", May 2004. I was fortunate to obtain ticket #001 for the event. #3090 was fully restored by the "Salvage Squad" TV programme crew in the UK.
Welsh narrow gauge locomotive

7mm scale, 16.5mm gauge, Branchlines 0-4-2 Talyllyn chassis under a Peco whitemetal body. Covered with automotive primer and ready for finishing. The unit will traverse < 15" radius curves. The nickel-silver chassis was assembled using a standard 30W pencil soldering iron; a process I will avoid in future projects. The whitemetal body was assembled using 5 minute epoxy.
kitbashed, freelanced rail car

HO scale, self-powered rail car. Major portions came from a Bachmann PCC streetcar and a Bachmann "old-time" combine. Grabs and railings were re-done in brass. The streetcar motor runs surprisingly well and the unit can pull several cars.
1803 locomotive
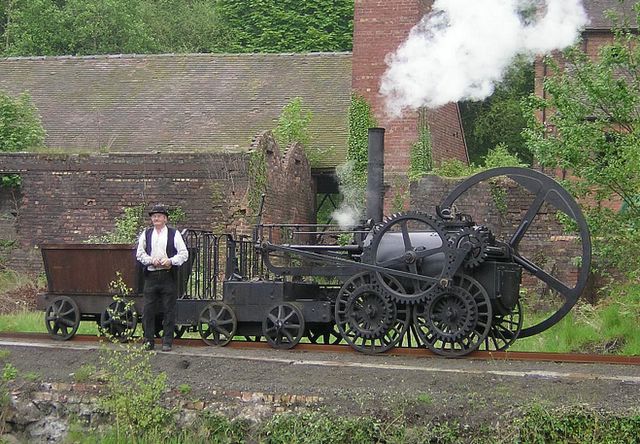
Working replica of Trevithick's Coalbrookedale locomotive. Ironbridge Gorge Museum, UK, May 2004. Note the use of "L" cross-sectioned rails. Travels about 1/4 mile in distance and 200 years back in time. I was priviledged to ride on the footplate for a few precious moments.
0-4-0 Porter modification

Bachmann On30 Porter modified with side tanks and side entry doors. Based on a NG&SL Gazette article by Nobuo Koizumi.
Sandy River & Rangely Lakes 2' gauge boxcar

Scratchbuilt double-sheathed boxcar in styrene and stripwood. Scale/gauge is Sn2. Trucks are Tichy HO archbar with a narrowed bolster. Wheelsets are from MDC HOn3 passenger trucks. Couplers are Kadee #714. Ties are Mt. Albert 5"x5"x5' sugar pine. Rail is code 55 Micro-Engineering pre-weathered.
In order to make use of commercially available mechanisms and wheelsets, Sn2 appropriates HOn3 components (in North America, at least). This makes the measured gauge between railheads 26.45" instead of Maine's actual 24". The difference of .038" in width is ignored in the interest of expediency. Some modellers add an extra few inches to the length of the 5'-0" ties in order to preserve the visual proportions.
In response to some (persistent) prodding, I am including a complete re-write of the unpublished article from 2007. I ended up painting the car for a fictional line I was going to call "Cumberland & York"...
A Sandy River & Rangeley Lakes Inspired Boxcar in Sn2
As a crew member for an On2 layout construction project, I've recently been exposed to an incredible wealth of two-foot gauge prototype photos as well as some wonderfully detailed models of rolling stock, motive power, and structures. I found the low-slung wooden cars very pleasing in size and proportion and began to get that unmistakable feeling of wanting one (or more) to call my own. My own area of interest centres around S-scale standard and 42" gauge in the mid 1950 timeframe, so I thought it would be interesting (and probably more appropriate for me) to build a car in Sn2 to demonstrate the relative differences in size of equipment.
The Sn2 Homepage (http://www.narrowtracks.com/Sn2/index.htm) and the Sn2_Trains discussion group at "Yahoo!" (http://groups.yahoo.com/group/Sn2_Trains/) gave me a good start with plenty of scale-specific information. I knew I would need to obtain at least trucks and couplers from commercial sources and it turns out that the Tichy HO archbar (#3002) and Kadee HOn3 couplers (#714) are the current components of choice for freight cars. Luckily my local hobby shop had both of these items in stock when I paid them a visit the next day. The HO archbar sideframes just happen to work out to a 4'-0" wheelbase in S-scale.
I dug through my boxes of "previously enjoyed" magazines looking for plans of the Maine 2' equipment. Fortunately, Jim Dunlop has made a significant contribution of drawings in 1/4" scale to The NG&SL Gazette over the years. Many railroads started out with only a small fleet of box and flat cars to carry their goods, so I thought it only fitting to choose a Sandy River & Rangeley Lakes boxcar in the #121-145 series as my first attempt (pg. 59, Sept/Oct 1990 Gazette). A quick trip to the photocopier (set at 75%) gave me enough reference sheets to begin work.
In order to pass the time at local train shows, I've been taking along a small project and an assortment of tools to get some modelling work done while I sit at one of the tables in our group's display area. Show attendees and fellow exhibitors always take the time to ask what I'm up to, and offer their ideas and advice. This time I took the boxcar drawings (reduced to 3/16"=1'-0") and enough Evergreen Styrene sheets and strip stock to make a start on the underframe and car sides.
Styrene is the material that I am most comfortable working with, even though I have enjoyed some success using brass and wood for a few projects. As I get better at building models, I'll probably try to make more items from robust metal and realistic wooden raw materials. Styrene just doesn't seem to lend itself well to locomotive frames or spindly wooden trestles. The proper tools and techniques for working with styrene are documented in many publications (including Evergreen's own comprehensive book), so I'll only mention how I've done something if I'm fairly certain that it's an obscure approach.
From the drawing I calculated the vertical siding width at 3" but the only scribed sheet stock I had represented a 3.2" width (Evergreen Styrene #2050, .050" spacing, .020" thick). I did not have access to a prototype car to actually count the number of boards and, realistically, there would have been variations in different batches of boards from the finishing mills at the time. Knowing that it would be unlikely for the average viewer to count the number of boards on the model, I quickly relented and made use of the on-hand material to make the most of the time I had set aside for this project.
By the end of the day I had the underframe, sides, and ends of the car formed and assembled to my liking. I decided to model the car with the doors closed, so the car sides are solid sheets with the doors applied on top, rather than having cut-outs for the door openings. This gave more gluing surface for the relatively thin (.020") stock I was using. The interior walls were also braced with longitudinal strips of styrene (about .080"x.080") to stiffen them and help keep everything square. The high-roofed, well ventilated hall we were in made applying the styrene solvent (Ambroid Pro Weld) much more bearable than my somewhat cramped and stuffy work area at home. During the show I also took time to answer questions from the attendees, scanned the various vendor tables looking for bargains, and found a quiet corner to enjoy some food and drink with acquaintances who are also involved in the hobby.
After returning home I undertook the job of narrowing the Tichy trucks. Here I ran into a bit of a snag as I miscalculated the amount I needed to cut off the first truck bolster's ends. I did manage to properly cut the second bolster and assemble the truck. In the case of the incorrect bolster I simply used a suitable section of square styrene for the bolster component. Wheelsets were taken from an MDC # 02929 passenger car package. The finished trucks are reasonably free rolling and well aligned, but there is some doubt in my mind as to their ability to stay together under long-term use with only CA (Zap-a-Gap) as an adhesive. It remains to be seen if these modified trucks will require installation of some mechanical fasteners for greater durability.
#3002 HO heavy duty Arch Bar truck (Tichy)
stock axle length .995" long (this would be end-to-end on the supplied Tichy HO axle)
stock truck bolster .960" long
#02929 HOn3 passenger truck (MDC)
HOn3 axle length .722" long
New (cut down) truck bolster length:
.995 - .722 = .273" total material to be removed from truck bolster
.960 - .273 = .687" new overall length of truck bolster
.273 divided by 2 = .1365" to be removed from each end of truck bolster
.687 + .1365 = .824" for setting your caliper (see below)
Set and lock the jaws of a vernier caliper at .824" (you do have a vernier caliper, right?). Using one end of the stock bolster as a guide, lightly scribe the other end of the bolster with the caliper jaw tip. Flip the bolster around and repeat the process on its other end . Cut the excess off one end with a razor saw and file up to the scribed line, ensuring that you are square both vertically and horizontally. Check that the overall length of the truck bolster is now .824". Cut the excess off the other end with a razor saw and file up to the scribed line, again keeping it nice and square. Set and lock the calipers at .687" and check the overall length. For sanity's sake, check the distance from the edge of the kingpin hole to each end of the truck bolster and see that they are equal to each other (in this case it was ~.297") otherwise the wheelsets will not be centred under the car. Press the nylon bearings into the Tichy journal boxes. Carefully hold the wheelsets in place and, using your other two hands, glue the side-frames to the modified truck bolster. Please note that if you are using different wheelsets than those supplied with the MDC truck (such as NWSL or Kadee HOn3) you must substitute their axle length for that of the MDC (.722" in this case) in the calculations above.
 |
| FIGURE 1: Scribing the bolsters |
Checking back on the Sn2 Homepage I noted the car underbody needed to be a scale 18" (9/32") from the railhead. The body bolsters were cut and adjusted several times before I was happy with how the car was sitting on the trucks. Not having any track laid at this point, I simply added 1/32" to the height I measured from the flat work surface to account for the depth of the wheel flanges. The body bolsters were drilled and tapped for #00-80 machine screws. Some interference occurred between the floor beams and sideframes during truck rotation, so the two small bolt-head castings at the top of each of the Tichy truck sideframes were filed off to eliminate this problem (these small details cannot be seen in any event).
 |
| What happens when you mess up the first bolster... |
 |
| FIGURE 2: Adding the coupler box |
 |
| FIGURE 3: "Tin" squares made from heavy paper |
 |
| FIGURE 4: The bevelled stripwood and its chopped wedges |
 |
| FIGURE 5: The basic roof assembly |
Grandt Line #5040 HO scale brake rigging was recommended to complete the underframe details, but I must respectfully disagree with this option. It would be far better to make up the few necessary pieces from scratch, as there are no components in this package that compare favourably to the photographic evidence I currently have access to. One brake compromise I had to make (for the moment) was the use of a Tichy #3003 HO brake wheel; I simply could not find a suitable 5-spoke, S-scale wheel in any of the catalogues I was able to refer to. From a typical viewing angle, none of the undercarriage brake rigging is visible to the operator; you need to have the model much nearer to eye-level to see it. As this was never intended to be a contest-quality model, I limited myself to a modified cylinder/reservoir from the Grandt package to enhance the silhouette for the time being.
 |
| FIGURE 6: Roofwalk and brakewheel added |
The car sides, ends, and trucks were brush painted Badger Model Flex Light Tuscan Oxide Red (#16-14). One of my assumptions is that an early 1900s, somewhat marginal 2' gauge operation would be unlikely to possess a full shop with spray painting facilities. Therefore my Sn2 models would be painted using a regular brush, rather than with an airbrush. Over this red I applied several thin washes of Polly Scale Engine Black (#414290). The bright silver MDC wheelsets were treated to a dunking or two in Blacken-It; the wheel treads were then lightly polished with fine steel wool (wheelsets with a narrower tread width would definitely improve the overall appearance of the model). The underframe, roof, and trucks were covered in a thicker wash of Engine Black. The roof looks as if some rough patches and sharp edges of the tin sheeting are showing through the black paint. The roofwalk boards were left unpainted to reduce their slipperiness in wet weather conditions. Woodlands Scenics MG702 letters and MG708 numbers dry-transfers were applied, and Bragdon Enterprises "Ash" powder was brushed on to dull the finish [SEE FIGURE 7].
 |
| FIGURE 7: Cumberland & York #124 |
Why did I choose to scratchbuild a car that is one of the few examples for which a kit is already available? Well, I learned more about real railroad car construction, tried out some new methods of assembly and painting, and got to know many new people in the hobby. In the end, I am fairly pleased with how the finished piece turned out. If you don't want to build everything from scratch, Train & Trooper sell appropriate Maine narrow gauge equipment in S-scale and have gone to the immense trouble and expense of importing several beautiful brass Forneys to supplement their range of structure and rolling stock kits (EDIT 2015: sadly, T&T are no longer operating).
What would I do differently on future Sn2 projects? Aside from more planning and careful study of each prototype, I'll have to collect and/or create a dedicated set of detail parts specific to 2' applications. The door details (hangers, brackets, latches) are particularly annoying, as scavenging bits from several casting packages (in O, S, and HO scales) leaves you with a bunch of incomplete part sets for your other models, and raises the per-Sn2-car price considerably. I now have several packages of Grandt Line #4001 car hardware and #6 door hangers that are missing bits; a very wasteful approach. Were I to desire a fleet of these cars I would certainly make "master" subassemblies, such as the doors complete with all details, and cast several dozen of each in resin. I would also plan to install a piece of brass bar stock or steel key stock in the centre sill area to add some weight to the assembly. Styrene by itself is simply too light to guarantee good tracking when switching cars during an operating session.
Once I get on with hand-laying any significant amount of track, there will be a need for some roller gauges and jigs for turnout frogs. Fortunately, these will be simple to fabricate from either brass or aluminium. I will also take the time to create a jig to allow me to accurately mill off the extra bits of the Tichy bolsters to get the right width of trucks "first time - every time". In the meantime, a couple of short lengths of code 55 rail laid with Micro Engineering "micro" spikes on 5"x5"x5' ties will do for display purposes. Sn2 track standards reflect HOn3 specifications; this results in 2' gauge in S being nearer to 26". There has been some discussion online of adding 2" to the tie length to compensate for any visual difference.
While I have been fortunate enough to obtain one of the T&T inside-frame 2-4-4 Forneys, I do intend to construct at least one other locomotive. My aim will not be to duplicate any particular Maine 2-foot unit, but rather to capture the general look and feel as closely as possible. I prefer the appearance of the Forney type, so another 2-4-4 or a 0-4-4 might be just the ticket. A recently located HOn3 Forney should provide a decent frame and boiler to attach a larger cab and details, if I can get a new motor fitted without major surgery. However, a 2-6-2 may be more straightforward to construct given the ready availability of MDC HOn3 Consolidation chassis and running gear. Resin domes and stacks, along with laser-cut cab components are available from Jerry Wilson (see the Manufacturers link at the Sn2 homepage) to compliment the MDC conversions.
My thanks go out to John Hitzeman, Trevor Marshall, and many, many others for their time and assistance with this project.
30 ton Newfoundland boxcar

Styrene and stripwood scratchbuilt representation of a Newfoundland Railway outside braced boxcar in Sn42. Magor Car Co. prototype. Trucks are 4'-10" wheelbase Andrews in resin (sprung).
Boxcars and flatcars represented the vast majority of NR equipment. This car was intended to be the first of my own small "fleet" of outside braced units. I learned very quickly that it is not efficient to build more than one or two cars if you are going to make them one-at-a-time.
Experience on this project prompted me to learn more about resin casting, mould making, and how the design and integration of master patterns differs from making just another part of a single model.
brass model of Welsh prototype

A miniscule Meridian Models O-14 (7mm/ft) Llechwedd slate quarry rubble wagon. A very nice little kit, but it generated a lot of burnt fingertips using a standard Weller TCP soldering iron.
I managed to pick up three small quarry wagon kits at a Meridian display table while in the UK visiting a preserved railway. They make terrific little kits in several scales. Their WWI equipment in 4mm scale was incredibly tempting. I'm actually sorry I didn't buy at least the Baldwin while I was there, despite not having any other 4mm models in my collection.
Hindsight is 20-20.
Subscribe to:
Posts (Atom)