Pages

2.10.2009

servos you right

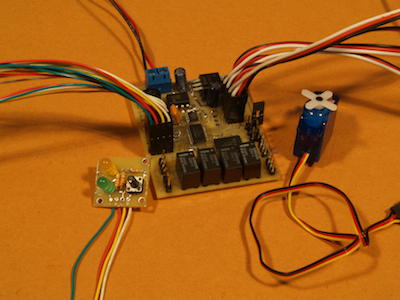
Duncan McRee has developed a DCC accessory decoder to enable R/C servos to control turnouts.


He is offering the schematics and source code free at the moment. I understand that pricing for pre-assembled units is to follow soon. The possibility to control other devices (turntables, signals, gates, etc.) is also present with code modification.

A short video of a beta unit in operation is available courtesy of the Model Railcast Show.

2.04.2009

iPodius

The Model Railcast Show is coming up on episode #50. Recent podcasts have covered benchwork construction and DCC topics.

The informal, ad-lib presentation style may not appeal to every taste but there is certain charm and spontaneity that you simply won't get with a script. Listening to the show often feels like you're just having a bunch of (knowledgable) guys over to your basement layout for a work session.

I have to applaud the primary host, Ryan, who is sticking his neophyte neck out every single show - letting everyone know he is not an expert model railroader. The honest (and sometimes basic) questions he asks his guests have forced me to re-think some of the things I "know" about the hobby and how to approach it. This has improved my understanding of areas I had taken for granted, and made me appreciate many aspects in different ways.

I find myself looking forward to each weekly installment. You do not need an iPod to listen to the programs; Quicktime, iTunes, or an mp3 player will do fine.

what?

There continues to be a lot of discussion about what it really means to be a model railroader. Frankly it's going mean a different thing to each person. It doesn't follow that any one approach or definition is going to be better or worse than any other.

One could argue that someone who only buys RTR is not really a model railroader. Unless, perhaps, their efforts are focused on modelling operations rather than equipment? You could also argue that someone who only builds models of equipment and doesn't have a layout to run them on isn't really a railroad modeller, just a model builder, right?

It really is too bad that so many people are spending so much time in specious arguments backed with dubious data. In the end, it's the person who isn't spending all of their time yakking it up in the discussion forums who is actually getting models built and running trains.

And that's what this whole exercise is supposed to be about, isn't it?

down time

Circumstance has temporarily dictated sedentary pursuits.

Having some time not otherwise occupied, I finally had a chance to hook up a LocoBuffer-USB from my PC to a Digitrax DB150 command station/booster. The free JMRI software allows you to program decoders, control the command station, operate virtual on-screen throttles, create CTC panels, and many other functions. Full details of hardware & OS support are on the website.

My main reason for implementing this software and hardware is to program decoders. I have one diesel, an S Helper Service SW9, with two decoders (Lenz Gold-JST & Soundtraxx DSD100LC-EH) which is a particular pain to program and keep track of the CV values. Hopefully I will be able to synchronise the sound & motion better using the graphical programming "DecoderPro" portion of the JMRI package.

I did notice that there is a mechanical problem with the diesel that I was unable to see or hear in the large auditorium of the last show. I will have to disassemble the loco to check out the issue. It seems that one of the pickup wipers is "clicking" during the wheel rotation.

1.08.2009

questions, questions everywhere, so let's just stop & think

There are a lot of questions flying around in discussion forums. Regular appearances are made by the likes of "What size turnouts should I use", "What colour should my fascia be", "How do I lay track", and "What rail code should I buy"? Reference Byron Henderson's slightly tongue-in-cheek post What sized t-shirt...?.

What can be considered very basic questions are asked for a variety of reasons. While some instances are a real search for answers they can also arise from pure laziness, the desire to pontificate, or even attempts at bushwhacking the self-proclaimed experts who populate all corners of the Internet.

A real tyro needs this basic information just to get started. Magazines like Model Railroader & Railroad Model Craftsman and 'getting started' books by Kalmbach & Carstens Publishing excel at presenting introductory material in an easy-to-digest, highly pictorial manner. The big trouble you run into on a typical forum is that one seemingly simple question will generate dozens of responses, often contradictory or even incomprehensible to a newbie. It's great if the inquirer can manage to sift through the resulting text to figure out what to do but it may leave them more confused and worse off than they started.

For many of these questions, the answer is going to be based on personal preference (what scale, what colour, what era) and no one (especially a stranger, even an expert one) will be able to tell you what your personal likes and dislikes are. The newbie will simply have to decide for his or herself. This will require personal effort in historical research, visits to clubs/layouts/real locations, watching videos, and simply reading books & magazines on the subject(s) coupled with some trial-and-error, hands-on work in order to get some idea of what's involved and how capable you are.

Once the initial hurdles of a) simply understanding model railroad specific terms and phrases, and b) learning about your own preferences are overcome, the newbie will be able to ask some informed questions and (hopefully) make better sense of the answers. Choice of an approach (freelance, prototype, protolance) and an honest evaluation of your own skills will shake out some of the remaining details (era, theme, turnout #'s, rail code, etc.)

The Internet has made it tremendously easy to cast a question out into a vast pool of knowledge but it useful to remember that, when fishing in a pool, you do not always hook into something you can digest. Don't rely on others to tell you what to do, or expect the "right" answers to arrive at the surface without getting your own feet wet.

11.25.2008

audio tracks

Some interesting material on the Model Railcast Show. Think of it as Model Railroad Radio. A number of episodes are available for on-demand listening.

They've had some great guests on for "Roundhouse" discussions regarding planning and design issues that are typical hurdles for modellers of all scales.

I was fortunate enough to be asked to speak about S Scale in show #40.

11.15.2008

lineside structure redux


The shed is complete enough to appear on the layout. As a concession to available modelling time, the tarpaper roof was simulated using 320 grit wet/dry sandpaper, cut grit side down with a guillotine. Gray dust is Bragdon Enterprises weathering powder.

Very glad I checked the paint scheme before painting; only the window sashes were Yellow, the window frames were #11 Green. Once the proper style of window has been obtained, I'll be able to add the sash details.

Possible & probable improvements/additions:
- correct 3-tab shingles
- oil tank & chimney (Scale Structure Ltd. p/n #2411 HO tank casting)
- replacement of side-sliding windows with proper, 6-pane style
- window glazing (microscope slide covers)
- sign board
- rain gutters/eave details
- a speeder to pose in front

I took some liberties with the construction; not having pictures of the structure in the timeframe being modelled forces me to fall back on both typical & assumed building methods of the era.

a tinkerer's tale

I am not a prolific modeller. I do not manage to complete a project a week. I tinker. I fiddle. I skip from task to task as thoughts prompt inquiry or shed some light on a hurdle to be overcome. Being surrounded by people who can produce large quantities of material on a regular basis can be daunting & intimidating. This is a constant source of irritation and distress, expecially when something really needs to get done.

Over on Mark Making Things, Mark talks about "Cheating Time" by breaking up a project into smaller and smaller discrete chunks that can be completed in very short time frames; a great approach to achievement.

Due to various space constraints (i.e. too much stuff, too little room), I cannot leave tools & projects out in the open. In-process work is therefore not readily available for short bursts of activity. If I find that I have 1/2 hour available, it may take that long to dig out what I need to proceed, only to find the sand in the glass has run out.

Think of the little (non-electronic, pre video game) puzzle composed of 16 spaces and 15 tiles. You shuffle the tiles around until a complete image or numeric sequence appears. Picture living in the one empty space, and having to shuffle all of the tiles (equipment, tools, projects) every time you want to do one little thing. It rapidly becomes easier to do nothing at all.


Activity is underway to correct the problem of space for the long term. Meanwhile, I have been gifted with sufficient room (and generous assistance) to put up my module set and work on it with an arranged schedule.

I always resort to to-do lists in order to codify what needs to be done, prioritise the sequence, and identify materials that need to be gathered. It can be a cumbersome method but, for those of us with atrocious time management, it can be enough to keep moving forward. Items are not listed with time estimates, simply the order in which they need to be completed. You slough along with whatever is current, until it is done.

That said, the MoW/speeder shed is nearing completion. Also, all the little paint touch ups on the module fascia, additional foliage, and the critical repair to the track alignment & elevation are done. Time before the next show may be running out, but the list of outstanding items is also diminishing at a gratifying rate.

"Why are you wasting precious time writing a Blog"? I hear you cry. Frankly, I find it helps to clarify my thoughts. It doesn't really matter if anyone else reads the content; it is available for my own review at any convenient Internet access point. It has always been meant as a journal or logbook rather than a publication. I can use it to remind me of things to do or methods to follow. In addition, it builds into a record of achievement which can be helpful when it feels like nothing has gotten done.

11.07.2008

to air is humane

I felt that the speeder shed needed better treatment than a brush-coat finish so I unpacked one of my old airbrushes (a Badger 350) and cabinet, fitted the coarse tip and had a go at it. One of the traditional complaints about airbrushing is the amount of prep and cleanup time & effort compared to the actual time spent painting. Using a single-action brush saves a lot of hassle and, unless you are doing very delicate weathering that requires minute paint flow control, is perfectly adequate for most hobby work.

The cabinet is made from a clear plastic, flip-top storage container which lies on its side. Furnace filter material is tacked over a frame in front of the extraction fan. The fan is an amazingly powerful, squirrel cage blower that came off a huge piece of stone-age computing equipment. The fan is attached to one end of the container where a circular hole is cut, and exhausts through flexible dryer vent tubing to a multi-flap dryer vent. The vent body is stuck through a piece of 1.5" thick extruded styrofoam sheet which is cut to snuggly fit the window opening. When the fan and compressor (Badger 280-1) are running it is bearably loud and there is absolutely no paint smell.


Badger ModelFlex CN Red #11 was used straight from the bottle. For future work I'll need to punch a larger hole in the top of a Badger #50-2016 "in-jar paint filter" as this version only fits the old, smaller diameter siphon tube. Having to strain the paint is a royal pain but it's a good way to keep the airbrush from clogging up as you work.

The shed trim and window frames will be painted Polly Scale ATSF Catwhisker Yellow, which is a near match to CN's off-white colour, prior to installation. This saves a lot of time-consuming masking and makes for a cleaner finish.

A separate base for the shed has been built and blended into the scenery on the module, along with a short stretch of code 55 trackage. The shed will be removable for protection between shows.

10.26.2008

domestic break

Just bought a nice, 15 light French door at the local "Re-Store" to use in one of the bedrooms of the condo. The door's surface has quite a lot of dent and scratch damage caused by mis-handling during salvage, but all of the glass is intact. Since the door will be painted, these cosmetic flaws are unimportant.

I was able, with the aid of a long metal straight edge and circular saw equipped with a planing blade, to cut 1/8" off each edge of the door to get it to fit into the existing door frame. This allowed for fresh dados to accomodate the hinges and kept everything nice and symmetrical. A quick trim of the top and bottom of the door completed the re-sizing.

The only major stumbling block is the height of the passage set. The position of the new door handle is lower than the existing door frame location. The door frames in the condo are one-piece metal assemblies. The strike plate location is fixed and cannot be moved up or down without a great amount of grinding, welding, and cursing.

The easiest solution is to raise the handle position in the door. Using a trepanning cutter in the drill press, I produced a number of pine slugs to fill in the existing holes. These have been glued and clamped into the body of the door, then shaved flush with a broad chisel. Using an appropriate hole saw and spade bit, I will re-drill the door at the new passage set location. Any remaining voids, dents, and scratches in the door will be filled with wood putty, sanded, and primed.

10.25.2008

a small lineside structure


This speeder/MoW shed is based on the one at Madoc, ON. I've added an extra window to the back wall of the "lunchroom/office" end to add a bit of visual interest as our modules are viewable from both sides. Siding is 6" wide scribed sheet that I found in a box of leftovers. Door and windows are Grandt Line castings (note the especially old black plastic door).

In the 50's the shed was heated by an oil stove so a suitable oval tank will need to be built outside the structure and a metal chimney will be poked through the roof. Later in life the shed lost the chimney (for unknown reasons) and the sides were covered in Insulbrick. Luckily, I'm modelling the 50's so I won't have to deal with the incredibly ugly appearance of Insulbrick siding.

10.20.2008

portly porter problem?

Dad purchased a Bachmann On30 porter (0-4-2) to use on his proposed 7mmNG, Welsh quarry inspired portable layout. From KeyKits in the UK, we obtained suitable Anglicising pieces (Wrightlines W996 cab kit and W963 chimney). The conversion itself was prompted by Brian Fayle's 7mm micro-layout workhorse and other examples from his website. The Bachmann chassis is a known "good runner" so we anticipate good service.

It did run well right out of the box, however, once the whitemetal cab pieces were substituted for the plastic details, the ends of the siderods started banging into the underside of the cab floor. "Too much weight!" was the initial thought but, upon partial disassembly, it was observed that one of the rear axle U-grooves in the plastic frame was deeper than the other. This caused the rear axle to tip out of true with respect to the front axle and the engine developed a list to one side.

This tilt caused the engineer's side of the cab floor to interfere with the siderod motion. ACC'ing a ~.015" thick pad of shim brass at the bearing surface of the over-deep U-groove solved the problem. Now the engine sits level on its axles and travels without any apparent binding.

The new cab assembly is secured to the stock footplate with flat head 1-72 machine screws countersunk into the underside of the floor. A stemwinder brake stand has been added to the footplate. The Bachmann steam dome needs to be removed from the saddle tank, and a simplified water fill hatch needs to be fabricated. The engine can then be painted and lined for service.

10.16.2008

more dip than a cocktail party

Well, not anymore. With judicious assistance, I finally managed to remove the pronounced dip at one end of the S scale module. Several possible approaches were considered before undertaking the work.
1) lever the extruded styrofoam "bedrock" up from below <- brute force and stupidity
2) hack into the structure sideways at the base of the ballast slope and jam in some shim material <- messy and imprecise
3) strip the rail off the affected area, stack new ties on top of the old, and carefully sand level. <- least destructive and easiest to verify results.

Ultimately choice #3 was pursued. About 2'4" of rail was removed and new sugar-pine ties were glued on with full strength Weld Bond adhesive to fill the depressed area. The opportunity was taken to re-align the rails slightly to eliminate a drunken wander in the main line. 50 grit paper was Super 77 spray adhered to one side of a 4" wide, 2' long, flat plank. 150 grit paper was likewise stuck to the other side of the plank.

The glue was allowed a long cure time before the ties were attacked with the 50 grit until nearly down to the original tie height at both ends. Sanding strokes were made perpendicular to the right-of-way to limit stress on the small gluing surface areas. Frequent checks were made to ensure that the new ties were not getting a crown or being tapered towards one side or the other. Once the old tie colour started to show through the thin skin left by the new ties at the extreme ends of the fill area the 150 grit side was used to clean up and de-fuzz the surfaces.


You can see how pronounced the dip was close to the module end by the rapid increase in fill-in tie thickness. Next the ties were stained with Floquil's "Tie Brown". What remains is the careful replacement of the rails to ensure they meet up with the previously marked positions at the end of the module, and the re-application of ballast around the new ties. A quick trip under the module with a soldering iron will re-attach the buss feeders, and re-testing will be done well in advance of the Christmas Train Show.

Why did the dip appear? Based on the sunken appearance of the ballast along the centreline of the ROW, I can only assume that the eye-dropper application of thinned adhesive was too agressive and the Tentest subroaded contracted as it dried up. This pulled the cork and ties downwards immediately after the end of the trapezoidal pine profile block at the end of the module (which remained flat & level).

Near the siding end of the split-rail fence, a copse of evergreens has sprung up. Short lengths of styrene tubing have been glued into the foam base to ensure rapid installation and removal of the trees for transport. There are twelve MountainView Depot conifers which are a far better looking and more consistently produced than anything I can manufacture.

Here's a product shot from the MountainView Depot gallery:


I'll need more of these, in various sizes, to add depth and texture to the rest of the module. In addition, a good number of flowering shrubs and low scrub will have to be applied to balance the scene.

9.12.2008

portable ponderings, part 1

Over time, I've been involved in many discussions regarding transportable (and fixed) layout construction. This has, of course, generated more than a few pro-and-con debates over the various approaches that can be taken to create the displays.

It might help if the process of creating the display were treated in a more methodical manner than is often employed. Each of the factors listed below have an effect on the finished product. Some consideration should be given to each point in turn.

WHO will be building the display?
- expertise
- free time
- workspace
- fabrication tools
- vehicles
- budget

WHY are you creating the display?
- to promote your aspect of the hobby (scale, gauge, era,
  location, theme)
- to enjoy the fellowship of like-minded hobbyists
- to operate your equipment

WHAT would be desirable features of the display?
- quick setup
- reliable operation
- low maintenance
- easy to build
- easy to transport

HOW will these goals be obtained?
- thorough planning
- standardisation
- simplified electrical & mechanical connections
- robust wiring
- solid framing
- good trackwork
- minimum tool requirements

WHAT will you need to achieve the goals?
- jigs & fixtures
- setup diagrams
- setup checklists
- equipment checklists
- electrical connections either clearly coded OR
  only one mating plug per interface
- one type of fastener for everything
- spares!

Further thoughts and discussion points will be posted on each of the above items as time permits. You may wish to reference the Layout Design Primer for in-depth analysis of a variety of topics.

9.11.2008

going loco

On the subject of getting lucky, after three-plus years of searching I was finally able to acquire an unbuilt S Scale Loco & Supply 2-6-0 Mogul kit (by Simon Parent). If I don't make a complete hash of the assembly, it should look something like this when finished:


Loco variety seems to be somewhat problematic in the S Scale world. There are not nearly as many choices as in almost any other scale. This leads to a lot of modification of ready-to-run hi-rail equipment into simulacra. For the most part, this is an acceptable approach to increasing one's roster. It can, however, present a problem when trying to achieve maximum fidelity to the prototype.

Once the Mogul is well underway (or indeed complete) I will be looking to obtain one of the MLW Services 4-6-2 Pacific conversion kits. The larger engine would be necessary to pull the heavyweight style passenger equipment typical of the mid 50's timeframe.

1.05.2008

chop, cut, rebuild

After much consideration and contemplation, I've decided to get out of On30 entirely save for one super gift from my better half.

On30 is an insidious and pervasive devil. It leeches time and effort from your primary interests. It's SO inexpensive, SO nicely detailed, SO reliably running, and SO damned cute. It's almost impossible to resist the lure. Before I knew it I had made far more expenditures than originally intended, and the resultant collection could be best described as "Miscellaneous" !

Because I realised that I had actually succumbed to the evil, I tried to resist - but you can't do it! MicroMark would have a sale on logging equipment; the local hobby shop would receive a new shipment; another article would appear on extraction of ore using irresistably battered critters. What a farce!

Despite resenting the time it takes away from "real" modelling you try to justify the purchases and the hours you spend dabbling in a "less serious pursuit" of the hobby. "It's just a bit of fun!", you say - deceiving yourself. But, in the end, it's neither fish nor fowl. It's not 2'. It's not 3'. It can be made to look something like either one, but it always takes more effort & hourglass sand than you planned to invest. And, ultimately, it never really looks close enough to the D&RGW or the SR&RL. The bodies are too high, or too wide, or not long enough, or the trucks are not the right ones for that RR. The details are too fine, too coarse, or not the right version - so you buy bags of Grandt Line, Precision Scale, or Coronado parts to super detail the rolling stock, and realise you've spent $50 to spiffy up a $25 car. Madness!

You try to divide your time and cover all of the bases, but you have to go to work, or school, or participate in the bliss of domesticity and wedlock and there just aren't enough hours in the day for both On30 and "real" modelling. Meanwhile all of your shelf space is consumed with rectangular green boxes and transparent bags of laser cut wood. You'll keep all of this stuff for "someday" when you have more free time, but meanwhile your precious and hard won hobby capital is tied up in great wodges of plastic and oddly shaped tongue depressors with burnt edges.

The final blow comes when you realise that some of the most vocal and active pursuers of the On30 muse are seemingly infatuated with whimsical models of outhouses on flatcars, "Flatulene" tank cars, "Stumpidium" and/or "Unobtainium" mines, rolling whorehouses, or trying to fit 18 linear feet of 9" radius track into a large (and possibly odorous) pizza-box.

The End?

Only of this chapter...
pressing business

I took apart an HO Model Die Casting 4-4-0 that was waddling down the track. Using a collet chuck and a DTI I was able to determine that the factory bored axle hole in one of the metal hubs was ~ .020" off centre.

I turned a cavity into a piece of 1" diameter steel rod stock chucked in the 3-jaw to form a cup chuck that the tyre rim would sit in without play. Loctite was used to hold the wheel firmly in place. I braced the wheel hub with the nose of the tailstock drill chuck overnight so it wouldn't shift while the Loctite cured.


Using a tiny endmill, I bored a new axle hole of larger diameter in the true centre of the wheel.


I then created a brass bushing to fill the gap between the larger hole and the existing shaft diameters from a length of brass rod held in an ER16 collet.


With my miniature arbour press (see previous post) I was easily able to fit the bush to the axle and the bushed axle into the newly bored wheel.

Checking with the DTI on the tyre rim I found the eccentricity to now be ~ .003", which was equal or slightly better than the remaining "stock" wheel measurements.

The locomotive no longer waddles but it does suffer from poor traction due to its rigid, uncompensated chassis design, light weight, and small motor. Unfortunately the driving axle is the forward one, which precludes any easy changes to the suspension which would improve operation.

12.09.2007

getting steamed


Over the summer I was able to attend a steam-up at a local enthusiast's home. Wow! There are some seriously interesting live steam engines out there; available either as kits or ready-to-run. The majority of the equipment at the event was 16mm scale (~1:19 proportion) and ran very well, often at surprising velocity.

16mm scale appears to be the ideal scale to pursue construction of the relatively small War Department equipment - a live steam, 2' gauge Baldwin is actually available in this scale (but I didn't dare ask the price).

11.30.2007

customer service

No, this isn't going to be a faerie tale. I want to make sure that two very worthy vendors get some public credit for doing a damned fine job.

1) Books for Business - This all sounds a bit unreal, BUT... Recently I wanted some books on machining techniques. I found a company in Toronto, Ontario called Britnell Books that had two of the three volumes I was after in stock at a terrific price. I called the phone number on their website and Books for Business answered. Turns out that they are co-located in the same building, and B4B answers the phone for Britnell after hours. Once I explained what I was looking for, the B4B staffer said she would pop into Britnell in the morning to see if the two books I wanted were still there. The next day I called to check if they were present. The lady said, "Yes, and there was a third volume by the same author on the shelf so I picked it out too, in case you wanted it." Brilliant! I had looked to see where they were located - right in the middle of the financial/legal district downtown. When I asked about parking in the area I was told, "We could just curbside it for you." ??? "Just pre-pay now and, as you are approaching the store in your car, give us a call and we'll step out onto the sidewalk and hand them to you." Absolutely amazing! B4B handled the transaction, was thoughtful enough to think ahead for my 3rd volume needs, and smart enough to come up with a lateral pass at the curb! All this for books that were not even in their own inventory and for a new and unknown customer. Frankly, I'm still stunned by it.

2) S Helper Service - I was looking for some components for a locomotive conversion project. I needed quite a bit of an SW9's running gear and realised I should go right to the source. Their product comes with a thin, but useful, illustrated instruction book/catalogue with all parts clearly laid out. I was able to contact their very responsive staff via email for answers to my questions, phone at a reasonable time to place the order, and received the parts with great speed via the US and Canadian postal services. At the time of the order, they were unsure of the shipping cost. When I received the parcel, I noted that the actual postage was $5 US. The receipt in the box indicated $15 Shipping & Handling. I had no problem with that whatsoever - I've been charged a much higher premium for attrocious service. HOWEVER, the very next day I received a letter from SHS with a refund of $10 US for the excess postage. Unbelievable!

Could it be that there are more companies like these two paragons of purveyance? I certainly hope so. This level of service demands some recognition and commendation. I heartily endorse them and wish them continued prosperity.

11.29.2007

Toronto Christmas Train Show 2007


Another year, another show at the International Centre. It seemed much less well attended than previous years however the aisleways were nice & wide and the hall was kept very clean.


The S Scale Workshop fielded 110' linear feet of Free-mo inspired modules in 1:64 scale. Many of the visitors commented favourably on the overall display quality. We realise there is more work to do, but we are very pleased with the progress to date.


The scenery on my own siding module turned out very well. The next show will be in Hamilton in 2008. This should allow plenty of time to make more progress with the structures and scenery.